MEAN STACK

HTML stands for Hypertext Markup Language. It is the standard language used to create web pages. HTML documents consist of elements and tags, which are used to create the structure and content of a webpage.

HTML consists of a series of tags, which are used to define the structure and content of a web page. The most basic HTML tags include the <html>, <head>, <title>, <body>, and <p> tags.

An HTML element is a block of content, such as a paragraph, heading, or image. Elements are surrounded by tags, which are used to define the type of element and provide additional information about it. For example, the <p> tag is used to create a paragraph element, while the <img> tag is used to create an image element.

The basic structure of an HTML document consists of a head and a body. The head contains information about the document, such as the title and meta data, while the body contains the actual content of the webpage.

The <!DOCTYPE> tag is used to specify the version of HTML that the document is written in. The <html> tag surrounds the entire document, and within it, the <head> and <body> tags are used to define the head and body sections of the document.

The <head> section contains information about the document, such as the title, which is displayed in the browser's title bar or tab, and metadata, which provides information about the document to search engines and other web crawlers. The <title> tag is used to define the title of the document, while the <meta> tag is used to provide additional information such as keywords and a description.

In addition to these basic tags, there are many other tags that can be used to create more complex web pages. These include tags for headings, lists, links, images, and more.

For example, headings are defined using the <h1> to <h6> tags, with <h1> being the highest level heading and <h6> being the lowest. Lists can be created using the <ul> (unordered list) and <ol> (ordered list) tags, along with the <li> tag for each list item.

The <body> section contains the actual content of the webpage. The content is divided into elements, such as HTML headings, HTML paragraphs, and images, which are defined using tags. Common tags used in the body include:

  • <h1> to <h6>: headings
  • <p>: paragraphs
  • <img>: images
  • <a>: links
  • <ul>: unordered lists
  • <ol>: ordered lists
  • <li>: list items
  • <div>: divisions or sections of the page, often used for layout and styling purposes
  • <span>: a small piece of content, often used for styling purposes

Images can be added to a web page using the <img> tag. The "src" attribute is used to specify the URL of the image file, while the "alt" attribute is used to provide a text description of the image for accessibility purposes.

HTML also includes several attributes, which are used to provide additional information about an element. For example, the src the attribute is used to specify the source of an image or script and the href the attribute is used to specify the link of an anchor tag.

HTML also includes tags for creating tables, forms, and other types of content. The <table> tag is used to create tables, with <tr> (table row), <th> (table header), and <td> (table data) tags used to define the rows, headers, and cells of the table, respectively. Forms can be created using the <form> tag, along with various input types such as text fields, checkboxes, and radio buttons, which are defined using the <input> tag.

HTML5 is the latest version of the HTML language and it was published in October 2014. HTML5 introduced new tags and attributes that can be used to create more interactive and multimedia-rich web pages. Some of the new tags in HTML5 include:

  • <article> – used to represent a self-contained composition in a document, such as a forum post, a magazine or newspaper article, or a blog entry
  • <aside> – used to represent a section of a page that contains content that is tangentially related to the content around the aside element, and which could be considered separate from that content
  • <audio> – used to embed audio files, such as music or sound effects, into a web page
  • <canvas> – used to create graphics and animations on the fly using JavaScript
  • <figcaption> – used to provide a caption for a <figure> element
  • <figure> – used to represent a piece of self-contained flow content, typically with a caption, that is typically referenced as a single unit from the main flow of the document
  • <footer> – used to represent a container for the footer of a document or section

It is used in conjunction with other languages such as JavaScript and CSS to create dynamic, interactive websites.

Cascading Style Sheets (CSS) is a separate language that is used to control the layout and style of an HTML document. CSS can be used to change the font, color, & size, etc. spacing of elements, as well as to control the layout of the page. CSS can be added to an HTML document in several ways, including:

  • using the style attribute within an HTML element
  • using a <style> tag in the head of the document
  • linking to an external CSS file using the link tag

JavaScript is another language that is often used in conjunction with HTML and CSS. JavaScript is a programming language that can be used to add interactivity and dynamic content to a webpage. JavaScript can be added to an HTML document in several ways, including:

  • using the script tag within the body of the document
  • linking to an external JavaScript file using the script tag

There are more HTML element that described below:

  1. <html> - Defines the start and end of an HTML document
  2. <head> - Contains meta information about the document, such as the title
  3. <title> - Defines the title of the document, which is displayed in the browser's title bar
  4. <body> - Contains the main content of the web page
  5. <p> - Defines a paragraph of text
  6. <h1> to <h6> - Defines headings, with <h1> being the highest level and <h6> being the lowest
  7. <ul> and <ol> - Defines unordered and ordered lists, respectively
  8. <li> - Defines a list item
  9. <a> - Defines a hyperlink
  10. <img> - Defines an image
  11. <div> - Defines a section of the document as a block-level element
  12. <span> - Defines a section of the document as an inline element
  13. <header> - Defines a header section of a document or a section
  14. <nav> - Defines navigation links
  15. <main> - Defines the main content of a document
  16. <article> - Defines a self-contained composition in a document
  17. <section> - Defines a section of a document
  18. <aside> - Defines a section of a page that contains content related to the main content
  19. <footer> - Defines a container for the footer of a document or section
  20. <form> - Defines a form for user input
  21. <input> - Defines various types of input fields, such as text, radio buttons, and checkboxes
  22. <select> - Defines a drop-down list
  23. <textarea> - Defines a multiline input field
  24. <label> - Defines a label for an input element
  25. <fieldset> - Groups related elements in a form
  26. <legend> - Defines a caption for a fieldset
  27. <button> - Defines a clickable button
  28. <table> - Defines a table
  29. <tr> - Defines a table row
  30. <th> - Defines a table header cell
  31. <td> - Defines a table data cell
  32. <thead> - Defines a container for the header content in a table
  33. <tbody> - Defines a container for the body content in a table
  34. <tfoot> - Defines a container for the footer content in a table
  35. <colgroup> - Specifies groups of columns in a table for formatting
  36. <col> - Specifies properties for a column in a table
  37. <caption> - Defines a caption for a table
  38. <style> - Defines a section for CSS styles
  39. <script> - Defines a section for JavaScript code
  40. <link> - Defines a link to an external resource
  41. <meta> - Defines metadata about the document
  42. <base> - Defines the base URL for all relative URLs in a document
  43. <audio> - Defines an audio player
  44. <video> - Defines a video player

There are many more which will be explored in upcoming articles. Meanwhile, stay tuned with us on Progrramers. We will see you again soon.

Thank You and Have a nice learning experience.

Hello, Friends Welcome Back to Progrramers. In this article, we will go to know “What is HTML?” We all, who are interested in computer programming, know very well that HTML is a language known as “Hyper Text Markup Language”. But the actual question is “What is a markup language?”.

So, before we go ahead, we must take a brief look at important points about What is HTML?

  1. First, we will contrast between standard and non-standard HTML webpages.
  2. And we will come to the point of knowing “What is HTML and where it exists?”.
  3. Then we will give a little focus on knowing the requirement of HTML and What does HTML do?
  4. And then, we will take a brief look at HTML Elements.
  5. At last, we will understand what HTML documents and HTML Web-page are.

The contrast between Standard and Non-Standard webpages.

News Page Cutting Image
Image no. one

Now you can see in image no. one there is News Paper Image. It has many news articles. If you focus on it, every news article starts with a proper bold heading and subheading. Why it is done? It is done with a purpose. It is a standard format of the article that keeps readers engaged with the content. The heading tells all about the news. By reading the heading reader knows what the entire article is all about.


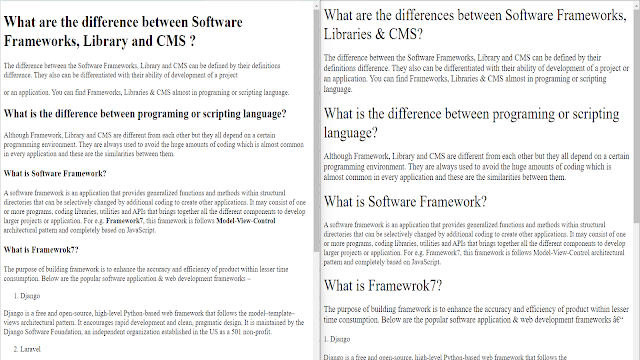
This is a standard format that is also followed by the WebpagesBlogs, and Articles on World wide web. Now you can see in image no. two there are two web pages side by side. When you observe both pages you will not find any difference except typography. But these two web pages have a big difference.


Side by Side comparison Image
Image No. Two


The left side web page is formatted with HTML to Heading, Sub Heading, and Paragraphs. On the other side web page is also formatted with HTML but with the obsoleted version of HTML. Currently, the first draft of the HTML 5.3 version is recommended by W3C (Wide Web Consortium) which is already retired in the year 2021. If we remove HTML from this web page, it will look something like shown in image no. three.

A web page image with no HTML
Image no. Three


With the beginning of the Search Engine era, a huge change came into the center of the world wide web: searching any content on search engines like Google, Yandex, Bing, Yahoo, etc. If you are looking for something on the internet just open Google and type the main words related to your content and the search engine brings a list of websites ranked by their content quality, popularity, user reaction, and many more things. Search ranking required many more features to be accurate on the web pages and it can be done with HTML. HTML provides scope to format the content of the article and display it on web pages.

On your screen’s left side is a standard web page and, on another side, there is also a web page that follows no standard. If want to check, open a website https://www.seobility.net/en/seocheck/ that can check search engine ranking and observe the results. You can in the results there is a big difference. The SEO score of the left side page is 66% but, on another side, the score is only 46%. We will discuss the SEO score in later videos.

What is HTML and where it exists?

Where does HTML exist?

HTML
is a client-side markup language program that exists on world wide web clients like “Web browser applications etc.”. HTML Stands for “Hyper Text Markup Language”. HTML is used the create web pages for web applications.


Why is HTML required what does HTML do?

The requirement of HTML can be understood by understanding the working method of data on the world wide web (internet). To understand this let’s assume the example of opening a webpage on a computer. Whenever the user clicks any link or enters a URL in the browser to open a webpage then a request is sent to the server and the server takes this request to process the query and develop the response data and send it to the user, as a result, the user gets the response data on the webpage.

These response data are called “Hyper Text Data” which is encoded and sometimes encrypted with another program and also required a data traveling medium which is called “Transmission Protocol”. This data must be displayed on the user’s screen in a proper readable format, therefore, the response data must be marked with appropriate tags to separate the heading, subheading, paragraph, links, and other kinds of data on web pages. On the user’s side, these marking tags must be parsed by a program which is these days known as HTML.

What are the HTML Tags or Elements?

An HTML web page consists of several HTML tags. Together these tags create a DOM tree which is processed on web browsers to build a web page. HTML tags are used to separate the data display format on web pages like headings, subheadings, paragraphs, lists, tables, links, and other kinds of data as shown in image no. four. Metadata is also a data type that exists on web pages in metaphase. These data cannot be accessed by users but they are accessible with appropriate algorithms like Search Engine Algorithms.

What are HTML documents and HTML Web-page?

Above mentioned lines may confuse you about HTML which elaborates that HTML exists on client-side web browsing applications, not on the serves. This confusion may be cleared by knowing something special about HTML.

The HTML coding which is done on servers and saved is called an HTML document. An HTML document must consist of a declaration of document type which signified the HTML version of the document, metatags, head tags, body tags, and the other required tags to build a web page. It is saved on servers with a proper filename and “.html” extension but it is not necessary to save the document with a “.html” extension. This part will be discussed in the coming articles.

Whenever the user opens the HTML document on a web browser it gives a standard formatted page on your device screen which is called a Web page. Web pages consist of a group or groups of HTML tags which is known as DOM.

DOM stands for Document Object Model that is parsed on webpages, it is an interface that represents the structure of a web page. It also connects web pages with styling, scripting, and programming languages, such as CSS, JavaScript, PHP, etc. We will go to know more about DOM in upcoming articles.

So stay tuned to progrramers on www.progrramers.com and keep learning.


Model-View-Controller (MVC) is a software architectural pattern that separates the logic of a programming framework into three modules that are linked in its main program. It allows dividing the software's business logic and user interface.


To understand MVC in the context of web development we need to understand What are the main programming modules of a Web Application. These modules are:


1. Server-Side Program
2. Client-Side Program
3. Database

Server-Side Program

The Server-Side program works on the server. It takes data from the Client-Side program via the GET or POST request method and stores the data in the Database. It also receives data from the database and provides the data to the client-side program to display the response. For Example ASP.Net, Java, Perl, PHP, Python, NodeJS, and Swift are the Server-Side Program.

PHP and NodeJS is very popular Server-Side open-source programing language. Open-source programming languages are available for free to use and build commercial applications. The most popular CMS (Content Management System) WordPress uses PHP as a Server-Side programing language.

Client-Side Program

The client-side program works on the client's (user's) devices, hence the same name. It collects the input data from users via Forms and sends it to Server-Side Programs to store data in Database or Sessions. It also fetches the data from Server and displays the response. For Example : HTML, CSS, JavaScript are Client-Side Programs.

Client-side programs also control the behavior of data display. It decides the color, size, position, and many other things. Lazy load is one of the popular client-side methods that break a large set of data into chunks and loads it with a certain action like on state change or page scroll or button click etc.

JavaScript is the most popular Client-Side programing language worldwide. There is a Framework called Framework7 that is completely built on JavaScript and based on the Model-View-Controller pattern. It allows the creation of web applications as well as Mobile applications at the same time. It can also be integrated with Server-side Frameworks like Laravel.

Learn framework7 - Framework7 Tutorial: What Is Framework7?

Database

A Database is a program that stores data for later use. The database collects data from server-side programs that are presented by clients (users). The database controls the flow of output data and decides what and how the data should be returned to the server-side in order to serve as a response. For Example SQL, MongoDB, Oracle, MariaDB, and SQLite are Database programs.

So, with the above topic now we have a clear concept of three basic modules of a web application. Now we are moving back to Model-View-Controller which is our main topic. MVC i.e., Model-View-Controller pattern was designed to navigate all these three components in the web application.

Basic Principle of MVC

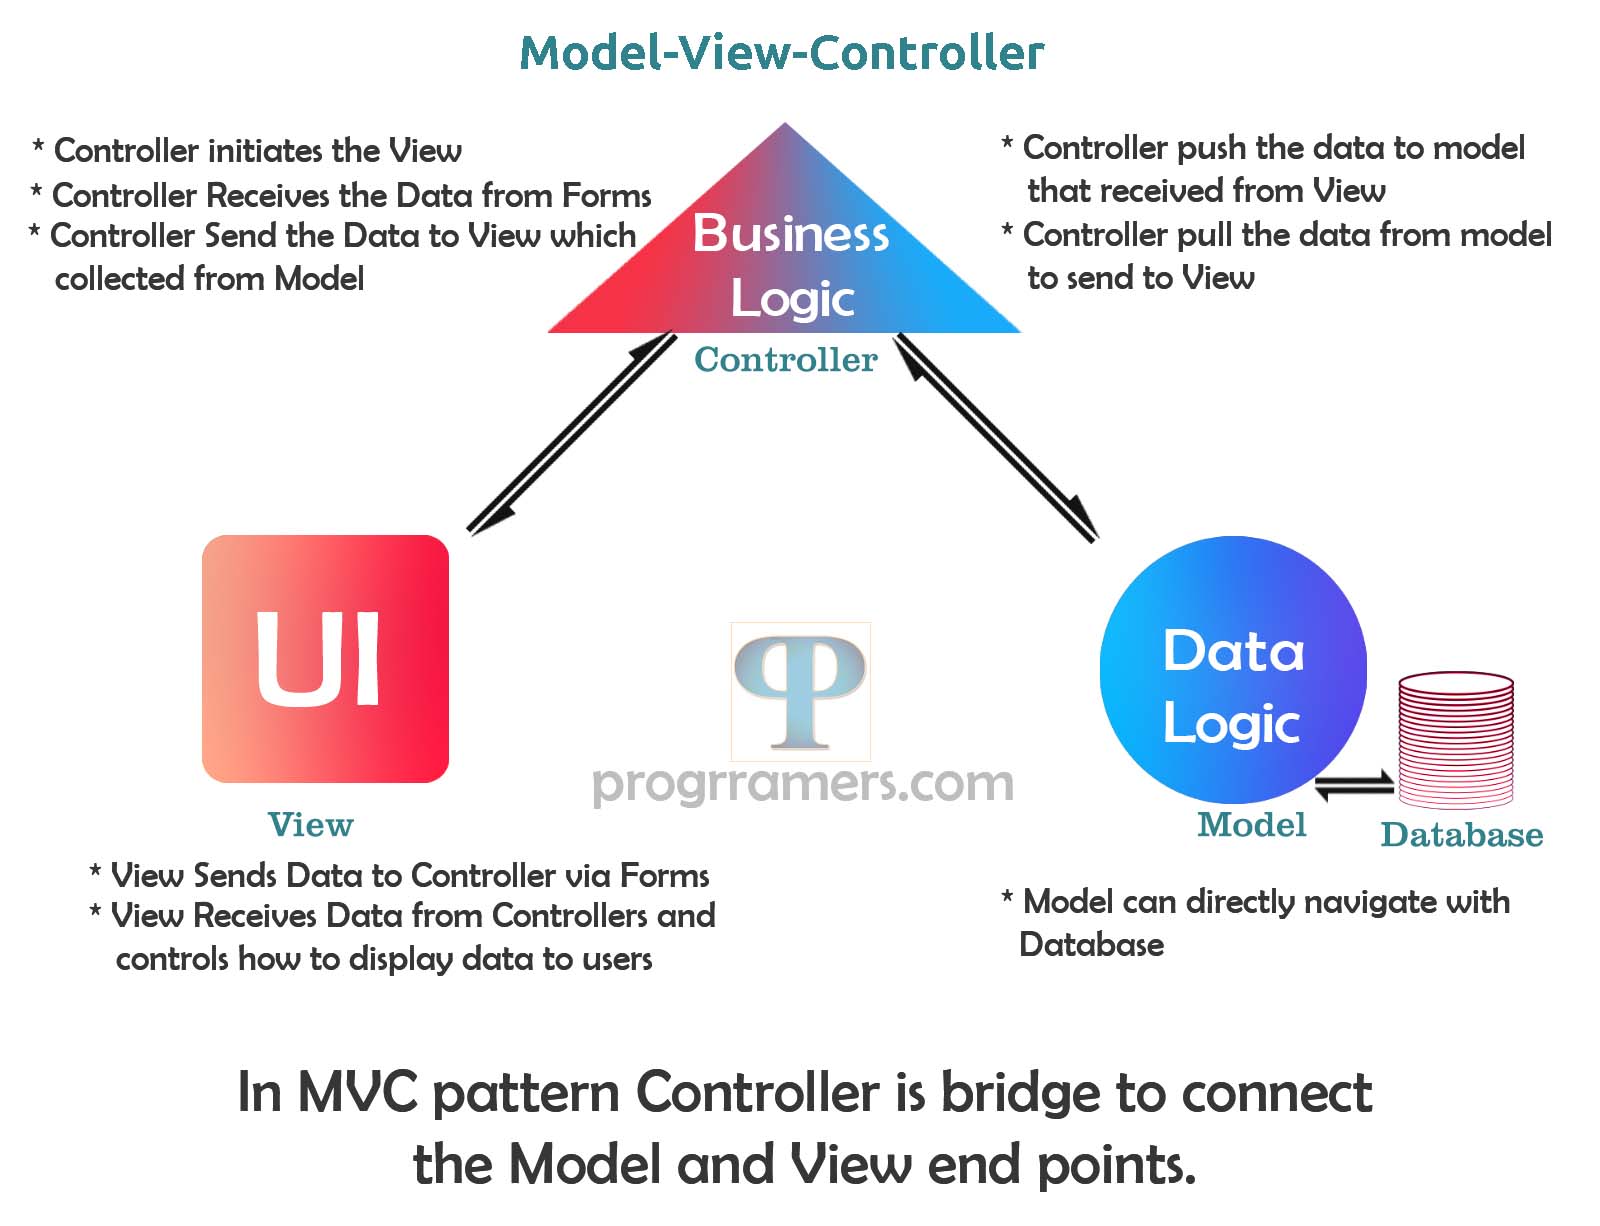
The basic principle of Model-View-Controller can be understood with the help of the below image.
 

What is MVC?

The Model View Controller (MVC) architecture pattern specifies that an application consists of a data model, presentation information, and control information. The pattern requires that each of these be separated into separate objects. MVC is more of an architectural pattern, but not for a complete application.

The Model can communicate with its data logic to the database. The model receives commands from the controller to pull data from the database or push the data to the database.

The View communicates only with the controller and receives the command from the controller on how to display data. The view is a User Interface it also sends the data to the controller via forms. The view has the responsibility to control the data displayed to the user.

By reading the above two paragraphs it can be easily understood that The Controller is a bridge between The Modal & The View that can control the initiation of The View and send/received the data to The View which was received from or sent to The Modal.

Now it is easy to understand that View can handle the Client-side programs and Controller is a Server-Side program and Modal is also a Server-Side program that directly communicates with the Database.

Why should use MVC Frameworks?

If you are a web developer and fond of writing neat & clean codes then MVC Frameworks can be the best choice for you because the most attractive concept of the MVC pattern is the separation of concerns.

This allows the front-end code to be separated from the back-end code and split into two separate components. So, it becomes much easier to manage the codes and make changes on one side without messing with each other.

Laravel & Mean-Stack are the best examples of Model-View-Controller (MVC). Learning Laravel is very easy because it has large community support and the Laravel framework gives the boosted security also.

Learn Laravel - Laravel Tutorial: What Is Laravel?


I’ll be continuing on my blog with this kind of article if you like my articles please follow me on my Facebook page: https://www.facebook.com/theprogrramers/


Thanks for giving me your precious time here, God bless you & see you later.

Hi Web Artisans! I’m back with a brand new article for the Laravel Tutorial Series. When you are talking about web development then what are the things that come to your mind? Well, I guess it is Speed and Efficiency. You can correct me by writing in the comment section if I’m wrong but the chances are minimum.

Speed ​​and Efficiency are two important factors when developing a web application. Here speed is the term which refers to the total time taken in the development of a web application and efficiency can be termed as a smaller number of bugs and errors in the final product.

You may or may not agree with me about the definition of speed and efficiency in the context of web development but the people like Taylor Otwell must agree with me who create Laravel Framework and intended for the development of web applications following the model–view–controller architectural pattern and based on Symfony.

So, in this article, we will see What is Laravel and why it is used?

What is Laravel?

Laravel is an open-source PHP-based framework and it is used to develop Web Applications. Laravel follows the MVC i.e., model–view–controller architectural pattern and it provides the expressive and elegant syntax as a set of tools and resources to build robust PHP applications.

Why Laravel Framework is used?

The above sentences are just a brief introduction to the Laravel Framework but in fact, Laravel is much more. Laravel has the most comprehensive and complete documentation and video tutorial library of all modern web application frameworks, making it easy to get started with the framework.

The best part is the community. If you have skills and ideas for development, you also can be a Laravel contributor. Thousands of talented & skilled developers from around the world have contributed to the framework. This is why Laravel has a great development community.

Laravel makes development fun by easing common tasks used in many web projects, such as:

  • Simple, fast routing engine.
  • Powerful dependency injection container.
  • Authentication Scaffolding.
  • Multiple back-ends for session and cache storage.
  • Expressive, intuitive database ORM.
  • Database agnostic schema migrations.
  • Robust background job processing.
  • Real-time event broadcasting.


Laravel is the Progressive Framework

Laravel's first beta release was made available on June 9, 2011, followed by the Laravel 1 release later in the same month and since then several updates was released. This is why Laravel is called a progressive framework. The current official version of Laravel is 9.x.

What kind of Framework is Laravel?

In terms of web application development, there are two types of Frameworks.

  • Back End or Server-Side Frameworks
  • Front End or Client-Side Frameworks

Laravel is a Back End Framework

Laravel is a Back End or Server-Side Framework. Unlike Front-End Framework Laravel can easily be used to develop business logic for very robust web applications. Laravel allows to enables the creation of simple pages, landings, and different forms. Apart from delivering output data, it boosts security during web attacks.

This is a much-needed reason why experts rate it as one of the best web frameworks for backend development. Laravel provides app maintenance and deployment services as well as several ways to use relational databases.

It offers very important key features like

  • Security
  • Template Engine
  • Eloquent Object Relational Mapping
  • MVC Architecture
  • Dynamic Routing System

Front-End Frameworks integration with Laravel

Front End is used to design web pages, develop complex user interfaces, associate data with DOM elements, style your components and make AJAX requests. It has nothing to do with business logic. For Front-End Development Laravel provides the mechanism to integrate Bootstrap and Vue JS Frameworks. For web & mobile application development simultaneously Framework7 also can be used which is a totally JavaScript-based Front End Framework.

Also Read: What is Framework7?

Laravel also can easily other libraries like jQuery, React, D3.js, Underscore, LODASH, ALGOLIA PLACES, and Anime.js. JavaScript libraries contain various functions, methods, or objects to perform practical tasks on a webpage or JS-based application. JavaScript library has codes or functions those developers can reuse and repurpose. A developer writes these codes, and other developers reuse the same code to perform a certain task, like preparing a slideshow, instead of writing it from scratch. It saves them significant time and effort.

Progrramers Laravel Tutorials

programmers.com is determined to bring the most comprehensive and accurate tutorials for beginners and advanced business development concepts to professionals.

Hello programmers! Welcome back to Progrramers – Web Development Tutorials. In this JavaScript tutorial, we will explore the methods to target the HTML Elements with CSS Selectors & Combinators using JavaScript. But before we step forward, allow me to inform you that you must know about the CSS Selectors & Combinators. If you’ve no idea about CSS Selectors & Combinators then please write it up in the comment section, I’ll post a separate article for that.

So, Let’s Start! We all know the fact that these days every single website is developed using multiple programming & scripting languages like PHP, JavaScript, CSS, etc. JavaScript is the most popular scripting language used on websites across the globe, therefore, it become essential to know the advanced uses of JavaScript.

We always become terrified of the target HTML Elements using JavaScript. Therefore, here we will try to present every content in a very simple way so that everything become crystal clear.

What is the CSS Selector?

A CSS selector is the first part of a CSS Rule. It is a pattern of elements and other terms that tell the browser which HTML elements should be selected to have the CSS property values inside the rule applied to them.

CSS Syntax


Code Copied

selector{property:value}


Code Copied

<!DOCTYPE html>
<html lang="en">

<head>
    <meta charset="UTF-8">
    <meta http-equiv="X-UA-Compatible" content="IE=edge">
    <meta name="viewport" content="width=device-width, initial-scale=1.0">
    <title>Document</title>
    <style>
        h1{color:#ff0000;}
    </style>
</head>

<body>
    <h1>This is heading</h1>
    <p>This is an example paragraph.</p>
</body>

</html>
Try Yourself

Explanation

In the above example, h1 is the selector of H1 heading element. With this selector, you can target all the <h1> elements on the webpage.

You can also read: JavaScript Tutorial : 5+ Methods To Target HTML Element In JavaScript, HTML JavaScript DOM

What is the CSS Combinator?

A CSS Combinator is something that describes the relation between HTML Element and the Selector. CSS Combinator is used to target one or more desired element(s) among the many elements. Just like the below example:

  • descendant selector (space)
  • child selector (>)
  • adjacent sibling selector (+)
  • general sibling selector (~)


Code Copied

<!DOCTYPE html>
<html lang="en">
<head>
    <meta charset="UTF-8">
    <meta http-equiv="X-UA-Compatible" content="IE=edge">
    <meta name="viewport" content="width=device-width, initial-scale=1.0">
    <title>Document</title>
    <style>
        h1~p{color:#ff0000;}
    </style>
</head>

<body>
    <h1>This is heading</h1>
    <p>This is an example paragraph.</p>
</body>
</html>
Try Yourself


Explanation

In the above example, you can see the adjacent paragraph of h1 is colored with ‘Red’ but which paragraph is before H1 tag is not styled with red color. This is done with the help of combinators.


How CSS Selectors and Combinators can be used in JavaScript?

To use CSS selectors &amp; combinators in JavaScript we have to use method which is querySelector() or querySelecrorAll(). Both methods are the part of document class of core JavaScript where CSS Selector & Combinators are used as parameters. You can see in the below example:


Code Copied

<!DOCTYPE html>
<html lang="en">

<head>
    <meta charset="UTF-8">
    <meta http-equiv="X-UA-Compatible" content="IE=edge">
    <meta name="viewport" content="width=device-width, initial-scale=1.0">
    <title>Document</title>
    <style>
        h1~p{color:#ff0000;}
    </style>
</head>

<body>
    <span>My Text</span>
    <script>
        document.querySelector("span").innerHTML="Hello Programmers!";
    </script>
</body>

</html>
Try Yourself

Explanation

When you run the code in Try Your Self you can find “My Text” inside <span> element is changed with “Hello Programmers!” text. Here what is going on that the querySelector() method targets the <span> element and changes it’s inner HTML content by using innerHTML property. The innerHTML property sets or returns the HTML content inside of an element.


You can also read: JavaScript Tutorial: What Are Ways To Get Output Data In JavaScript?


What is the difference between qureySelector() and qureySelectorAll() ?

Before we move ahead it might be possible that a question will be raised in your mind what’s the difference between querySelector() and querySelectorAll()? The answer is very simple querySelector() is a method that is used to target the only first HTML element occupied in a webpage by using CSS Selectors &amp; Combinators but querySelectorAll() targets and returns all the similar kinds of elements by using the same CSS Selectors &amp; Combinators.

How to target HTML element with querySelector() method?

This is very simple likewise in the previous article we have done with document.getElementByID(“element-ID-Attribute”). Here is only the difference that whenever we target by document.getElementByID() method we use Id attribute string inside the parenthesis as parameter but here in querySelector(“#element-ID-Attribute”) we can also use elements Id attribute started with ‘#’ and if we use the class of element then we must be started with ‘.’ like in CSS. . Element's tag name can be also used. You can also check the below examples:


Code Copied

    <script>
        document.querySelector("p").style.color="red";
    </script>
Try Yourself

Explanation

The above example shows that querySelector(“#demo”) method targeted only the first element of the webpage and add a style attribute with CSS Color property & red color value there for only the first paragraph text turned red.


Code Copied

    <script>
        document.querySelectorAll("p").forEach(e => {
            e.style.color="red";
        });
    </script>
 
Try Yourself

Explanation

In the above example, you can see all the paragraph's colors turn into ‘Red’ because we have used to add style attribute property with the red color value to all paragraphs by using foreach loop.

The querySelectorAll() target and returns a node list of all the similar kinds of elements on the webpage this is why we have used foreach loop in this case.

Keep going with our upcoming articles on JavaScript where we will discuss foreach loop.

This is why it becomes easy to target the HTML element with CSS Selectors & Combinators. Look at the more examples given below and try them yourself.

How to use ID & Class Attributes

ID and Class are attributes of an element and both can be used with any HTML element. ID refers to the identity of any HTML element occupied on a loaded document on a webpage. Id of an element on a loaded webpage must unique. For e.g., <h2 id=”demo”></h2> where demo is a unique id reference of <h2> element and after it no HTML element id  can be referred as ‘demo’.

Although using it twice or more will not through any error until any kind of coding conflict occurs but it is against the system's nature. An Id attribute of an HTML element can have a single id.

Class attribute refers an HTML element as part of a class. For e.g., <h2 class=”demo demo1”></h2>, <h2 class=”demo demo2”></h2>, <h3 class=”demo demo1”></h3>. Example show that class attribute same value can be used multiple times on same loaded HTML document on webpage and a class attribute can have the multiple values.

Now take a look at the below examples and understand.


Code Copied

<!DOCTYPE html>
<html lang="en">
<head>
    <meta charset="UTF-8">
    <meta http-equiv="X-UA-Compatible" content="IE=edge">
    <meta name="viewport" content="width=device-width, initial-scale=1.0">
    <title>Document</title>
</head>
<body>
    <h2 id="demo">This is Heading</h2>
    <h2 id="demo1">This is Heading</h2>
    <h2 id="demo2">This is Heading</h2>
    <h2 id="demo3">This is Heading</h2>
    <p>Id must be unique on a webpage becuase an Id attribute of HTML Element referes unique identity of that element.</p>
</body>
</html>


Code Copied

<!DOCTYPE html>
<html lang="en">
<head>
    <meta charset="UTF-8">
    <meta http-equiv="X-UA-Compatible" content="IE=edge">
    <meta name="viewport" content="width=device-width, initial-scale=1.0">
    <title>Document</title>
</head>
<body>
    <h2 class="demo red">This is Heading</h2>
    <h2 class="demo green">This is Heading</h2>
    <h2 class="demo blue">This is Heading</h2>
    <h2 class="demo brown">This is Heading</h2>
    <p>Class can be used multiple time with same or different type of HTML element becuase it refers  </p>

    <script>
        document.querySelectorAll("h2.demo").forEach(e=>{
            e.setAttribute("style","color:"+e.classList[1]);
        });       
    </script>
</body>
</html>


More examples will be covered in our YouTube Video please subscribe. Click Here to Subscribe Progrramers-YouTube Channel.

Finally, the conclusion is that querySelector() and querySelectorAll() methods are most used in any professional website. Especially in jQuery library is selector functions are built with these methods. If you find any problems or any questions in your mind please write them down in the comments. I’ll be there with the best possible solution for you. And rest programming is always about making improvements. Facebook founder & CEO Mark Zuckerberg recently told that Facebook could be more efficient than today if we would have done coding in past likewise today, we do.

I really wish to see you in my rest article.

If you want to get a clearer concept, please also subscribe progrramers YouTube Channel. Please Click on Subscribe Button.

In the previous chapter of JavaScript, we have learned the method to target the HTML Element. Now we are about to move on 'How many possible ways are there to display output in JavaScript?'

Although JavaScript executes many of task that has no concern with the display but most of the times different types of JavaScript output data required to display on browser.

JavaScript can display output data in different ways. Below are the properties, methods, and functions that can be used to display output data in JavaScript.

  1. Using innerHTML property
  2. Using innerText property
  3. Using textContent property
  4. Using document.write() method
  5. Using alert()
  6. Using console.log()
  7. Using print()

Using innerHTML property

The innerHTML property is part of the Document Object Model (DOM) that allows JavaScript code to manipulate a website being displayed. Specially it allows reading and replacing everything within a DOM Element (HTML tag).

The innerHTML property can output the data in the form of HTML content. You check in the example.


Code Copied
<script>
    document.write(document.getElementById("test").innerHTML);
</script>
Try Yourself

Using innerText property

The innerText property sets or returns the text content of the specified node and all its descendants.

If innerText property is used then child nodes are removed and replaced by a single text node.


Code Copied
<script>
    document.write(document.getElementById("text").innerText);
</script>
Try Yourself

Using textContent property

The textContent property us similar to the innerText property of JavaScript but there is a difference between them. We will discuss those differences later in this article.


Code Copied
<script>
    document.write(document.getElementById("text").textContent);
</script>
Try Yourself

Using document.write() method

The document.write() is a method which writes a string of text to document stream. The write() method writes HTML expression or JavaScript code to a document. The write() method is used for testing purposes mostly.

If document.write() method is used after fully loaded HTML page then it will override all the existing HTML and gives new HTML Page.


Code Copied
<script>
    document.write(document.getElementById("text").textContent);
</script>
Try Yourself

Using alert()

The alert() method in JavaScript displays an alert box with a specified message along with an 'OK' button. It is often used to make sure that information comes through the user. The alert() box takes the focus away from the current window and forces the browser to read the message.


Code Copied
<script>
    function getAlert(){
        alert(document.getElementById("test").innerHTML);
    }     
</script>
Try Yourself

Using console.log()

The console.log() is a function in JavaScript that is used to print any kind of variables defined before console.log()or to just print any message that needs to be displayed to the user.

console.log() is used for debugging purposes we can call the console.log() method in the browser to display data.


Code Copied
<script>
    console.log(document.getElementById("test").innerHTML);        
</script>
Try Yourself

Using print()

JavaScript print method is used to print the contents of the current window. It basically opens a print dialog box in the browser.


Code Copied
<script>
    function getPrint(){
        print();
    }         
</script>
Try Yourself

What is the difference between innerHTML, innerText, and textContent?

innerHTML property allows us to work with rich text and doesn't automatically encode and decode text. We can get the data to display in a rich text format where CSS can also work.

innerText property retrieves and sets the content from the HTML tag as plain text where spaces are trimmed in results but the CSS styling can be displayed in results. 

textContent property retrieves and sets the content similarly innerText but spaces and whitespace cannot be trimmed and CSS styling cannot be displayed in results.

ID and Class attributes are the most common selectors that widely used to target the HTML DOM while working with JavaScript. Have you ever thought why we mostly prefer to use the id and class while many of the methods are available to target the HTML Elements in JavaScript?

First of all, we look at all the methods to target the HTML Elements using JavaScript.

For reference you can check the multiple examples below.

How to target HTML elements using ‘id’?


    <div id="test"></div>
    <script>
        //we want to print "Hello World inside div"
        document.getElementById("test").innerHTML="Hello World!";
    </script>
Try Yourself

In this method we target the Single HTML element within the DOM tree using its ID attribute. While using ID, it always returns a single node of HTML DOM.

The most important thing is that using two or more HTML elements with the same ID on the same web page can produce the unexpected error, therefore, we should be careful using the ID attribute while creating the web page.

How to target HTML Elements using ‘class’?


    <!--Different HTML tags with same classes-->
    <h1 class="test"></h1>
    <div class="test"></div>
    <p class="test"></p>
    <span class="test"></span>
    
    <script>
        document.getElementsByClassName("test")[0].innerHTML="This Heading";
        document.getElementsByClassName("test")[1].innerHTML="This is div";
        document.getElementsByClassName("test")[2].innerHTML="This is paragraph";
        document.getElementsByClassName("test")[3].innerHTML="This is span";
    </script>
Try Yourself

In this method we target one or more HTML Elements with the same class name. When we target HTML Elements with the class name, each HTML element with the same class becomes the part of that class, it returns a list of nodes (referred to as NodeList in the console) instead of a single node where each node can be referred with the index number like given in above example.

The index number of each node is decided by its appearance on the web page. For e.g. the index of the very first node is referred to as [0] and second as [1] and so on. If the position of any node is changed on the webpage then its index will be also changed accordingly and it might affect the index of rest upcoming nodes also.

Even we target a single element with the class name, it returns a list of nodes but the difference is that there is only a single node present in that list.

Therefore it is a better idea to use class names but in a structured way.

We will study more about classes in further chapters

How to target HTML Elements using ‘tag name’?


    <h1 class="test"></h1>
    <div class="test"></div>
    <p class="test"></p>
    <span class="test"></span>
    <span class="test"></span>
    <script>
        document.getElementsByTagName("H1")[0].innerHTML="This Heading";
        document.getElementsByTagName("DIV")[0].innerHTML="This is div";
        document.getElementsByTagName("P")[0].innerHTML="This is paragraph";
        document.getElementsByTagName("SPAN")[0].innerHTML="This is first span";
        document.getElementsByTagName("SPAN")[1].innerHTML="This is second span";
    </script>
Try Yourself

In this method we target one or more HTML elements with their tag name. You can see in the above example. Likewise class case, it also returns a set the node list where each node can be accessed by the specific index number.

How to target HTML Elements using the ‘name’ attribute?


    <!--Different HTML tags with same classes-->
    <form action="">
        <div><input type="text" name="fname" placeholder="first name" value="John"/></div><br/>
        <div><input type="text" name="lname" placeholder="last name" value="Doe"/></div><br/>
        <div><input type="email" name="email" placeholder="email" value="john@progrramers.com"/></div><br/>
        <div><input type="url" name="website" placeholder="website" value="https://progrramers.com"/></div><br/>
        <div><input type="button" name="submit" value="Save" onclick="formdata()"/></div><br/>
    </form>
    <p name="test"></p>
    <script>
        function formdata(){
            var fname=document.getElementsByName('fname')[0].value;
            var lname=document.getElementsByName('lname')[0].value;
            var email=document.getElementsByName('email')[0].value;
            var website=document.getElementsByName('website')[0].value;
            document.getElementsByName("test")[0].innerHTML = "First name: "+fname+"<br/>Last name: "+lname+"<br/>Email: "+email+"<br/>Website: "+website;
        }
    </script>
Try Yourself

In this method we target one or more HTML elements with their name attribute. You can see in the above example. Likewise class case, it also returns a set the node list where each node can be accessed by the specific index number.

Note: Name attribute’s value also can be accessible in the post method of server-side scripts like PHP. We will deal with it during the tutorials of server-side scripts.

How to target HTML Elements using the ‘querySelector’ method?


    <div id="test_id"></div>
    <div class="test_class"></div>
    
    <script>
        document.querySelector('#test_id').innerHTML="This is First DIV Element.";
        document.querySelector('.test_class').innerHTML="This is Second DIV Element.";
    </script>
Try Yourself

In this method we target single HTML Element using CSS selector. In CSS if we want to target element with tag name we use the tag name, or if we want to use the ID or Class then we use ‘#’ with ID and ‘.’ with the class name. Similarly we can use CSS all selector to with query selector method.

Likewise ID case, it returns only the first node present on the web page.

How to target HTML Elements using ‘querySelectorAll’ method?


    <div id="test_id"></div>
    <div class="test_class"></div>
    <div class="test_class"></div>
    
    <script>
        document.querySelectorAll('#test_id')[0].innerHTML="This is First DIV Element.";
        document.querySelectorAll('.test_class')[0].innerHTML="This is Second DIV Element.";
        document.querySelectorAll('.test_class')[1].innerHTML="This is Third DIV Element.";
    
        console.log(document.querySelectorAll("DIV"));
    </script>
Try Yourself

This method is the same as the query selector method but in this method we target one or more HTML Elements using CSS selector and it returns a set the node list where each node can be accessed by the specific index number.

You have seen all the examples given above. These are the methods to target the HTML DOM or HTML DOMs in JavaScript. You must know a few things also which are mentioned below

  1. The methods that return the list of nodes can be looped. Check example 7 ahead.
  2. Although node list can be looped they aren’t referred to as an array because array must have few methods like push, splice & sort but not in case of node list.
  3. ID, Class, and Name are the attributes that can be directly accessed in JavaScript. For reference Check example 8.
  4. Id & name attribute can have one value at a time and can be used only once on the webpage but the class can have multiple values at the same time. The value should be separated by space. For e.g. class=”container box primary”. There are three different classes in the example container, box & primary.

How to apply loop on a NodeList?


Code Copied
<div class="test"></div>
    <div class="test"></div>
    <div class="test"></div>
    <div class="test"></div>
    <div class="test"></div>
    <div class="test"></div>
    <div class="test"></div>
    <div class="test"></div>
    <div class="test"></div>
    <script>
        var el=document.querySelectorAll('.test'),n=1;
        el.forEach(element => {
            element.innerHTML="This is DIV No. "+(n++);
        });
    </script>
Try Yourself

How to Find ID, Class & Name Attribute Values?


<div id="test_id">This DIV has id Attribute</div>
    <!--Class can have multiple value-->
    <div class="test_class1 test_class2 test_class3">This DIV has class Attribute</div>
    <div name="test_name">This DIV has name Attribute</div>


    <p id="result_1"></p>
    <p id="result_2"></p>
    <p id="result_3"></p>

    <script>
        document.getElementById("result_1").innerHTML = document.getElementById("test_id").id;
        document.getElementById("result_2").innerHTML = document.getElementsByClassName("test_class1")[0].className;
        document.getElementById("result_3").innerHTML = document.getElementsByName("test_name")[0].getAttribute("name");
    </script>
Try Yourself

In the previous chapter of JavaScript Tutorials, we have learned about what JavaScript can do? Now we are about to learn that How and Where to use JavaScript on an HTML Document?

How to use JavaScript on HTML Documents?

Before we go forward we need to understand the most important thing and that is ‘How a web page is parsed on a web browser? This question is most important because until unless we don’t understand the working principle of a webpage, we can’t develop it with any client-side scripting language like JavaScript.

We already know that JavaScript manipulates the HTML DOM by changing its inner HTML, inner Text, values, and style. JavaScript is used to perform a certain task or chain of the task and execute it on the browser by changing the status of HTML DOMs. To do so we have to find and target the specific HTML DOM with various methods that we will learn in upcoming chapters. 

To understand the above sentences we need to check the below example.


<!DOCTYPE html>
<html lang="en">
<head>
    <meta charset="UTF-8">
    <meta name="viewport" content="width=device-width, initial-scale=1.0">
    <title>Example of JavaScript</title>
</head>
<body>
    <div id="test"></div>
    <script>
        document.getElementById("test").innerHTML = "Hello World!";
    </script>
</body>
</html>
        
Try Yourself

What we see in the example above given. There are two things in the above example

The first thing we see there is an HTML document contains a DIV element with an attribute named ID. The value of the ID is ‘test’. We required printing Hello World inside the DIV element dynamically using JavaScript when a web page is loaded.

Second thing, there is also a script tag just before the end of body tag where are some codes are written which is not likely HTML codes. Actually the codes written in script tags are JavaScript. JavaScript codes are written between <script> tags on HTML documents.

Now to understand the working principle of the above example you can copy and paste the above code in your favorite HTML editor and save the file with .html file extension and run into your favorite browser. You will see ‘Hello World’ printed on the web page.

On the web page loading process, we simply target the HTML DIV tag by its ID using “document.getElementById()” method and setting the value ‘Hello World’ of its ‘innerText’ so that when the web page completely falls on the browser it prints ‘Hello World’ text.

This is how we target the HTML DOM on an HTML web page using JavaScript. This was only an example but in professional projects, we do something like this on a large scale. We will sure study that in this tutorial series.


Why & when use type attribute within <script> tags?

Now we know that JavaScript codes are written inside <script> tags. Let’s check a few another example given below

JavaScript codes with a type attribute in script tags


<!DOCTYPE HTML PUBLIC "-//W3C//DTD HTML 4.01 Transitional//EN" "http://www.w3.org/TR/html4/loose.dtd">
<html lang="en">
<head>
    <meta charset="UTF-8">
    <meta name="viewport" content="width=device-width, initial-scale=1.0">
    <title>Example of Use of Type Attribute</title>
</head>
<body>
    <div id="test"></div>
    <script type="text/javascript">
        document.getElementById("test").innerHTML="JavaScript is a Scripting Language.";
    </script>
</body>
</html>
        
Try Yourself

JavaScript codes without type attribute in script tags


<!DOCTYPE html>
<html lang="en">
<head>
     <meta charset="UTF-8">
     <meta name="viewport" content="width=device-width, initial-scale=1.0">
     <title>Example of HTML5 Version Doctype</title>
</head>
<body>
     <div id="test"></div>
     <script>
          document.getElementById("test").innerHTML="JavaScript is a Scripting Language.";
     </script>
</body>
</html>
Try Yourself

In both examples can you see the difference? You can see in example 2 <script> tag is used with type attribute and in example no 3 <script> tag is used without type attribute.

This is happening because of the HTML Document version. Before HTML version 5 JavaScript is not the default scripting language of HTML so we must specify the type of scripting language. Older browsers are not able to find the type of script language therefore JavaScript might not work.

But since HTML 5th version JavaScript is becoming the default scripting language, therefore, we are not forced to use type attribute in script tag while working with JavaScript.

Note: Above both examples can work in the latest browsers without type attribute. The problem comes with only older browsers.

Where to use JavaScript on HTML Documents?

Above all the examples are demonstrating to us how to use JavaScript on an HTML Document. Now let’s move on Where to use JavaScript on HTML Documents?

Before we go ahead first we need to understand how an HTML Document is parsed on a browser and become a web page.  Usually, HTML Document is parsed on a browser top to bottom and left to right. It means that the most top line of the document is parsed first into left to right direction therefore whole HTML DOMs must be parsed over web browsers before JavaScript functions are called.

If it doesn’t happen then the browser console will throw the script error and it can be case wise different. Another thing is that by default JavaScript declared functions and variables are stored on the top level in primary memory while launching the web page whether they are declared on top of page or bottom of the page, therefore, we should not worry about where we are trying to keep our JavaScript codes on HTML document. Therefore we can place JavaScript declared functions and variable between the <head> tags like the below-mentioned example


<!DOCTYPE html>
<html lang="en">
<head>
    <meta charset="UTF-8">
    <meta name="viewport" content="width=device-width, initial-scale=1.0">
    <title>Example of Declared Functions</title>
    <script>
        //declared functions and variables
        var x = "You have clicked the button."
        function myFunction(){
            document.getElementById('test').innerHTML=x;
        }
    </script>
</head>
<body>
    <div id="test"></div>
    <button onclick="myFunction()">Click</button>
</body>
</html>
        
Try Yourself

We should worry about only JavaScript calling functions which must be executed at the most end of part of the web page so that All HTML DOMs can found easily found which are targeted by JavaScript. It is good practice to place JavaScript codes on the most bottom part of HTML <body> tags, mention like below example


<!DOCTYPE html>
<html lang="en">
<head>
    <meta charset="UTF-8">
    <meta name="viewport" content="width=device-width, initial-scale=1.0">
    <title>Example of Calling Functions</title>
    <script>
        //declared functions and variables
        var x = "You have clicked the button."
        function myFunction(){
            document.getElementById('test').innerHTML=x;
        }
    </script>
</head>
<body>
    <div id="test"></div>
    <button id="test-button">Click</button>

    <script>
        //calling function defined in <head> tags
        document.getElementById("test-button").onclick=function(){
            myFunction();
        }
    </script>
</body>
</html>
        
Try Yourself

Also, it is observed that placing JavaScript code at the bottom of <body> tags improves the display speed because script interpretation slows down the display.

Above shown examples are a type of internal JavaScript but there is another type of JavaScript also which can improve the development speed without harming the performance of the web site.

What are the types of placement of JavaScript on an HTML Document?

  1. Internal JavaScript
  2. External JavaScript

What is Internal JavaScript?

Internal JavaScript is a practice in which all the JavaScript codes are written separately in every document. The drawback of this practice is that we have to write a similar type of code again and again which slows down the development speed. All the above show examples are a type of internal JavaScript.

What is External JavaScript?

In this practice JavaScript codes are written in a separate file which has the file extension “.js”. To embed the external JavaScript file on the web pages we have to use <script> tags with a specific attribute named ‘src’ which holds the location path of the external JavaScript file.

Take a look at a below-given example. This example is created using jQuery CDN. You will learn jQuery in further chapters.


<!DOCTYPE html>
<html lang="en">
<head>
    <meta charset="UTF-8">
    <meta name="viewport" content="width=device-width, initial-scale=1.0">
    <title>Example of Absolute Path Over jQuery Content Delivery Network (CDN)</title>
    <script src="https://code.jquery.com/jquery-3.5.1.min.js" integrity="sha256-9/aliU8dGd2tb6OSsuzixeV4y/faTqgFtohetphbbj0=" crossorigin="anonymous"></script>
</head>
<body>
    <div id="test"></div>
    <button id="test-button">Click</button>
    <script>
        $(document).ready(function(){
            $('#test-button').click(function(){
            $('#test').html("Hello World!")
            });
        });
    </script>
</body>
</html>
        
Try Yourself

Few points must be noticed while creating an external JavaScript file.

  1. JavaScript file created with .js extension is not a web page rather a script page.
  2. JavaScript file cannot contain the <script> tags.
  3. Multiple JavaScript pages can be used on a single HTML document.
  4. It is important to declare the HTML web page doctype because before HTML5 JavaScript not default scripting language. We have to specify the ‘type’ attribute in <script> tags to make active scripting language.

What are the advantages of external JavaScript?

  1. HTML and JavaScript codes are separated while using external JavaScript
  2. JavaScript code which required to be executed again & again on different pages is not required to write multiple times.
  3. It makes developers easy to maintain and develop the program fast.
  4. You can use different specialist code editor at the same time. For example, Notepad++ is best for HTML, and VSCode is best suitable for JavaScript.
  5. External JavaScript code can be cached into the client device therefore cached JavaScript file can speed up the page load.

Using absolute and relative path reference for external JavaScript

 External JavaScript files can embed on HTML documents using relative or absolute path references which show below in the examples.

To understand relative or absolute file path learn HTML5 Tutorial - HTML File Path


//declared functions and variables
  var x = "You have clicked the button."
  function myFunction(){
  document.getElementById('test').innerHTML=x;
}


<!DOCTYPE html>
<html lang="en">
<head>
    <meta charset="UTF-8">
    <meta name="viewport" content="width=device-width, initial-scale=1.0">
    <title>Example of External JS file using absolute path</title>
    <script src="script.js"></script>
</head>
<body>
    <div id="test"></div>
    <button id="test-button">Click</button>
    <script>
        //calling function defined in <head> tags
        document.getElementById("test-button").onclick=function(){
            myFunction();
        }
    </script>
</body>
</html>
        

Copy the JavaScript codes given in example 7 and paste into your favorite text editor and save as script.js and after that once again create a new file in the text editor and copy HTML codes from example 8 and paste into the text editor and save the document as 'example8.html'. Both the files must be located into same directory. 

After that run the example8.html file in the browser, you will see on the web page there is a button named 'Click'. When you click the button then a sentence 'You have clicked the button' will appear on the screen. This means the JavaScript codes written in a separate file is embedded properly and working fine.

On HTML file example8.html you can see <script> tag with 'src' attribute having the value 'script.js' which the name of JavaScript file. Actually the source of JavaScript is fetching on the web page from that file which is embedded with HTML document through a 'Relative path'.

Similarly, look back into example 6 where you can find <script> tag with 'src' attribute having a value 'https://code.jquery.com/jquery-3.5.1.min.js'. It is an example of an absolute URL. To know more about the relative and the absolute path you have to read our another topic HTML5 Tutorial - HTML File Path.

Hello programmers! This is a new “JavaScript How To” post which describes ‘How to create Cascading Dropdown Using Plain JS’. This is an example of multiple dependent dropdown lists. Multiple dependent cascading dropdown lists are very useful when you want to display the data in specific categories. You can change drop down options based on another dropdown lists.

First of all, you can click on Try yourself button in below example and check what are we going to create and after that you will find all the require source code of this project. You can also bookmark the repository of progrramers GitHub community where you can find and download the source code of other projects.
If you like our posts please give thumbs up  👍 on our Facebook page and also share with your near n dears.


Diagram

In this example we are assuming that there is a school. It has multiple class rooms, every class room contains multiple sections, every section contains multiple subjects and at last every section period will held on a different room. You can see the whole scenario in below image given for the reference.

How to create Cascading Dropdown Using Plain JS - progrramers

The data will be in tree structure which is used to parse as options in 'SELECT' elements. Let's see the work flow of the final product.

Work Flow 

  1. Classes names only append into select element onload first.
  2. When Selecting a Class then section options will append, available with that class. Same work flow for sections, subjects and rooms.
  3. When Class gets changed then sections, subjects and rooms also get reset. Same work flow for sections, subjects and rooms. Synopsis when a drop down element updated then all next siblings also gets reset.
Now you can copy the code and paste it into your favorite editor and save as ‘anyname.html’ and run into your favorite browser. Analyze the code and if you are getting any problem then feel free to write down into the comment section I’ll try to be more specific into the answers.

You can also get this code on github : How to create Cascading Dropdown Using Plain JS.html

How to create Cascading Dropdown Using Plain JS :

<!DOCTYPE html>
<html lang="en">
<head>
    <meta charset="UTF-8">
    <meta name="viewport" content="width=device-width, initial-scale=1.0">
    <meta http-equiv="X-UA-Compatible" content="ie=edge">
    <title>Document</title>
    <style>
        *{box-sizing: border-box;font-family: 'Segoe UI', Tahoma, Geneva, Verdana, sans-serif;}
        .classform{border: 5px groove #00acf0;background: #c5c5c5;border-radius: 4px;}
        div{padding:5px;}
        .classform>div{width:450px;display:block;margin-left:auto;margin-right:auto;}/*for responsive look*/
        label{background: #00acf0;color:rgb(255, 255, 255);text-shadow:1px 1px 1px #777}
        label,select{display:inline-block;padding:6px;border-radius:3px}
        label{width:100px;}
        select{width:250px;}
    </style>
</head>
<body>
    <div class="classform">
        <div><label for="class">Class: </label> <select name="class" id="class"></select></div>
        <div><label for="section">Section: </label> <select name="section" id="section"></select></div>
        <div><label for="subject">Subject: </label> <select name="subject" id="subject"></select></div>
        <div><label for="room">Room: </label> <select name="room" id="room"></select></div>
    </div><hr/>
    <a href="https://www.facebook.com/theprogrramers">Follow us on Facebook Page</a>
    <script>
        //class structure data in JS object format
        var structure = [
                {label:"class",value:"1",child:[
                    {label:"section",value:"A",child:[
                        {label:"subject",value:"Math",child:[
                            {label:"room",value:"1 (A)",child:[]},
                        ]},
                        {label:"subject",value:"Hindi",child:[
                            {label:"room",value:"1 (A)",child:[]},
                        ]},
                        {label:"subject",value:"Science",child:[
                            {label:"room",value:"1 (A)",child:[]},
                        ]},
                    ]},
                    {label:"section",value:"B",child:[
                        {label:"subject",value:"Math",child:[
                            {label:"room",value:"1 (B)",child:[]},
                        ]},
                        {label:"subject",value:"Hindi",child:[
                            {label:"room",value:"1 (B)",child:[]},
                        ]},
                        {label:"subject",value:"Science",child:[
                            {label:"room",value:"1 (B)",child:[]},
                        ]},
                    ]},
                    {label:"section",value:"C",child:[
                        {label:"subject",value:"Science",child:[
                            {label:"room",value:"1 (B)",child:[]},
                        ]}
                    ]},
                    {label:"section",value:"D",child:[
                        {label:"subject",value:"Math",child:[
                            {label:"room",value:"1 (B)",child:[]},
                        ]}
                    ]},
                ]},
                {label:"class",value:"2",child:[
                    {label:"section",value:"A",child:[
                        {label:"subject",value:"Science",child:[
                            {label:"room",value:"2 (A)",child:[]},
                        ]},
                        {label:"subject",value:"Sanskrit",child:[
                            {label:"room",value:"2 (A)",child:[]},
                        ]},
                        {label:"subject",value:"English",child:[
                            {label:"room",value:"2 (A)",child:[]},
                        ]},
                    ]},
                    {label:"section",value:"B",child:[
                        {label:"subject",value:"Math",child:[
                            {label:"room",value:"2 (B)",child:[]},
                        ]},
                        {label:"subject",value:"Civics",child:[
                            {label:"room",value:"2 (B)",child:[]},
                        ]},
                        {label:"subject",value:"Geography",child:[
                            {label:"room",value:"2 (B)",child:[]},
                        ]},
                        {label:"subject",value:"Economics",child:[
                            {label:"room",value:"2 (B)",child:[]},
                        ]},
                    ]},
                    {label:"section",value:"C",child:[
                        {label:"subject",value:"Math",child:[
                            {label:"room",value:"2 (C)",child:[]},
                        ]}
                    ]},
                    {label:"section",value:"D",child:[
                        {label:"subject",value:"Math",child:[
                            {label:"room",value:"2 (D)",child:[]},
                        ]}
                    ]}
                ]},
                {label:"class",value:"3",child:[
                    {label:"section",value:"C",child:[
                        {label:"subject",value:"Hindi",child:[
                            {label:"room",value:"3 (A)",child:[]},
                        ]}
                    ]}
                ]},
            ];
        //global variable declaration to store value stepwise
        var cindex, sindex, jindex;
        //calling funfction onload
        window.onload = function(){
            classstrucure(structure, document.querySelectorAll('[name=class]'));
        }
        document.querySelector('body').addEventListener('change',function(e){
            if(e.target.tagName.toLowerCase() == "select"){
                if(e.target.value!==""){
                    //check of nextsibling is null or not 
                    nextsibling = e.target.closest('DIV').nextSibling.nextSibling;
                    if(nextsibling!==null){
                        var _nameAttr=e.target.getAttribute("name");
                        var nextElm = nextsibling.querySelectorAll('SELECT');
                        //for your project only you have to change the attributes name
                        if(_nameAttr==='class'){
                            cindex = structure.map(function(i){return i.value}).indexOf(e.target.value);
                            classstrucure(structure[cindex].child, nextElm);
                        //for your project only you have to change the attributes name
                        }else if(_nameAttr==='section'){
                            sindex = structure[cindex].child.map(function(i){return i.value}).indexOf(e.target.value);
                            classstrucure(structure[cindex].child[sindex].child, nextElm);
                        //for your project only you have to change the attributes name
                        }else if(_nameAttr==='subject'){
                            jindex = structure[cindex].child[sindex].child.map(function(i){return i.value}).indexOf(e.target.value);
                            classstrucure(structure[cindex].child[sindex].child[jindex].child, nextElm);
                        }
                    }
                }else{
                    //e.target.value is empty then same function will fire with defferent parameters
                    clearsturcture(e.target.closest('DIV').nextSibling);
                }
            }
        });
        //function create the structure of class step wise
        function classstrucure(data, el){
            //first clear all the select element onload
            //clear all next sibling accept itself
            el.forEach(element => {
                clearsturcture(element.closest('DIV')); 
            });
           // clearsturcture(el[0].closest('DIV'));            
            var opt = '<option value="">--Select--</option>';
            //creating options elemnet
            for(var i=0;i<data.length;i++){
                opt += '<option value="'+data[i].value+'">'+data[i].value+'</option>';
            }
            //appending option on each element
            el.forEach(element => {
                element.innerHTML = opt;
            });
        }
        //clear all the next drop down element after itself
        function clearsturcture(parentEl){
            while (parentEl) {
                if(parentEl.tagName !== undefined){
                    //appending initial option on every next sibling
                    parentEl.querySelector('SELECT').innerHTML = '<option>--Select--</option>';
                }
                //looping through last existing sibling and target
                parentEl = parentEl.nextSibling;
            }
        }
    </script>
</body>
</html>
Try Yourself

Related Topics