November 2017

The HTML <head> Element

The HTML <head> Element is defines just after the <!DOCTYPE html> declaration. The contents laid down in between the head tags aren’t visible over the web pages except <title> tags. Content specified in between the title tags is displayed on the top of the web browser with favicon like below example:

Example - 1

HTML5 Head tag - Favicon and Title


Metadata

Metadata is the most important data which is defined on the html document. Metadata is defined inside the <head> tags.
Metadata is the set of the information that can be machine parsable but not visible on the web pages. It defines the data of the html document. Metadata can be defined in the <meta> tags. Meta elements are the typically used to specify Page Description, Keywords, Author of the Document, last modified and the metadata. The metadata can be used by browsers (how to display content or reload page), search engines (keywords), or other web services.

Example - 2

<head>
  <meta charset="UTF-8">
  <meta name="description" content="Tips and Tutorials of Programming Languages">
  <meta name="keywords" content="HTML,CSS,XML,JavaScript">
  <meta name="author" content="Progrramers">
  <meta name="viewport" content="width=device-width, initial-scale=1.0">
</head>


Tips: Name, content and charset defined above in the <meta> tags which is called attributes of meta tag

What is the viewport?

HTML5 introduced a method to let web designers take control over the viewport (the user's visible area of a web page), through the <meta> tag. The viewport is the user’s visible area of the web page. It varies with the devices screen size. A <meta> tag named viewport gives the instruction on how to control the page dimension and scaling with respect to the screen size. Read given example carefully

Example - 3

<meta name="viewport" content="width=device-width, initial-scale=1.0">


In above example metadata name is “viewport”. The width=device-width part sets the width of the page to follow the screen-width of the device which will vary depending on the devices like Large Screen of Desktop/Laptop or Small Screen of Tabs/Smartphone. The initial-scale=1.0 part sets the initial zoom level when the page is first loaded by the browser.

We will read more about this Meta type in the Responsive Web Page.

Below are the Metadata type and their definition which will help you to understand the metadata.

Example - 4

1. The Keywords defines the keywords for the search engines.
<meta name="keywords" content="HTML, CSS, XML, XHTML, JavaScript">

2. The description describe the content of the web page.
<meta name="description" content="Tips and Tutorials of Programming Languages">

3. The author define the author of website.
<meta name="author" content="Progrramers">

4. This will refresh the document in every 30 seconds.
<meta http-equiv="refresh" content="30">

5. Sets the user’s visible area of the web page.
<meta name="viewport" content="width=device-width, initial-scale=1.0">



Related Topics

In previous chapter we have learnt about HTML Elements and now we will learn about HTML attribute. Now the most important question is arising that what is attribute?

The simple answer is that Attribute is a valid name value pair that provides additional information to HTML elements on web page.

An attribute either modifies the default functionality of an element type or provides functionality to certain element types unable to function correctly without them.

Let’s suppose an article writer who uses to write articles and he need to create quick links between the articles or a blind person is listening the blog and an image comes in between how would he know what that image is?

In these case attributes empower HTML elements and add some more and useful information.

HTML ‘href’ Attribute

Example - 1


<a href = “https://www.facebook.com/theprogrramers”>This is a Link to go through Progrramers Facebook Page. </a>


In above example href is an attribute that changes the default functionality of anchor element and modifies it into hyperlink. Without href attribute looks like a paragraph on web page.

Tips: Using anchor element “<a>” without “href” attribute is meaningless. If a paragraph does not required to be created as a link then it must be written inside <p> tags.

More Attributes come with Anchor Element:

target: Target attribute specifies where to open the linked document.

rel:  Rel attribute specifies the relation between current document and linked document.

We will study more about anchor element in further chapters.

Now an article writer can create quick links to jump to another related articles. This is also very useful to rank better over search engines.

HTML "src" Attribute

Example - 2


<img src = “https://goo.gl/oK5ctq”  width = “100” height = “100” title = “Logo” alt = “Progrramers Logo” />


In above example you can see <img /> element. The whole process is that <img > element sets the frame of the image on web page and after that every task is done by the attributes. “src” attribute fetch the image to web page, width and height attributes sets the size of image and two other attributes “Title” and “alt” are very important.

Let’s understand in details 


"src" attribute can fetch the image on web page with help of provided image URL. We have to provide a valid url. In the above example, URL is taken from the web and shorted from Google tools but look at below example.

Example - 3

<img src = “img/logo.jpg”  width = “100” height = “100” title = “Logo” alt = “Progrramers Logo” />


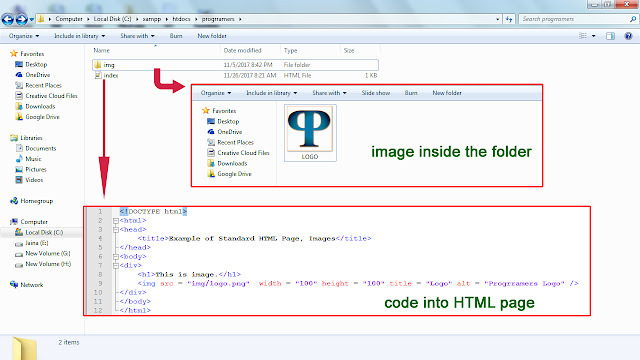
In above example we have taken the image URL from local storage. Image file extension must be mentioned with URL like “logo.jgp”. Here “.jpg” is the extension of the image file which defines the type of image. For this example we are using JPEG image file. Try yourself by Copy and paste above HTML code into your text editor, save as index.html and create a folder named “img” in the same directory where you index.html file stored. Paste an image file (“.jpg”, “.png”) named logo and open your html document in web browser. See what the result is.

Special Example

Example of img attribute


width and height attributes are determine the size the image.

title attributes define the title of image and when hover (move over) the cursor (mouse pointer) over image then it display the image title like a tool-tip. Title attribute can used with other elements like heading, paragraph, anchors other input elements too.

Tips: Check in your web page, when you hover on the mouse then it displays (“Logo”).

alt attribute is very important attribute in <img> element. This best practice is to always specify the alt attribute inside <img> element.

Sometime image cannot load over the web page due to several reasons like slow internet speed etc. then alt attribute displays the information of image or when a blind person listening the blog then image alt attribute value can be read by the screen reader program so that the blind person can easily hear that value and understand that what is that image.


HTML Lang Attribute

The language of an HTML document can specify inside <html> element.
After <!DOCTYPE html> declaration we can declare the language of the document by declaring “lang attribute” inside the <html> element like below example:

Example - 4


<!DOCTYPE html>
<html lang = “en-US”>


HTML Style Attribute


Style attribute is used specify the styling of the elements like size, color, font type etc.


Example - 5

<p style = “color: red; font-family: verdana;background-color: #cccccc;”>This is an example of paragraph using style attribute</p>

Looks like:
This is an example of paragraph using style attribute.


We will study more about style in CSS chapter.

How to use single or double quotes

The HTML5 standard does not required single or double quotes but not using them can produce unexpected results. Double quotes are commonly used around attributes value but single quotes also can be used. In some situations, when the attribute value itself contains double quotes, it is necessary to use single quotes like below examples:


Example - 6


<p title = “Virat ‘Run Machine’ Kohli”>Virat Kohli is the most Test Century maker as a captain in India</p>

Or

<p title = ‘Virat “Run Machine” Kohli’>Virat Kohli is the most Test Century maker as a captain in India</p>


The Selector Attributes

The selector attributes are used in the element to select the specific elements. Selector attributes are very important in HTML Document.

The HTML document contains lots of similar elements like headings, paragraphs etc.  To target specific element in specific condition we use selector attributes inside the elements. We use two selectors attributes in HTML one is “id” and the other is “class”. We use two selectors attributes in HTML one is “id” and the other is “class”. Generally we only use selector attributes while working with CSS, Java Script.

The id Attribute

id” is selector attribute that is used to define specific style of specific element. We use id attribute with a value inside the element.


Example - 7

<p id = "id_1">This paragraph color is red.</p>
<p id = "id_2">This paragraph color is Green.</p>


The Class Attribute 

To define a style for a special type of elements, add a class attribute with a value inside the element.


Example - 8

<p class = "class_1">This paragraph color is blue.</p>
<p class = "class_2">This paragraph color is yellow.</p>


You will learn more about the use of id and class attributes in CSS and Java Script in further chapters.


Example - 9

<!DOCTYPE html>
<html>
<head>
<style>
#id_1{
color:#FF0000;
}
#id_2{
color:#00FF00;
}
.class_1{
color:#0000FF;
}
.class_2{
color:#FFFF00;
}
</style>
</head>
<body>
<div>
<p id = "id_1">This paragraph color is red.</p>
<p id = "id_2">This paragraph color is Green.</p>
<p class = "class_1">This paragraph color is blue.</p>
<p class = "class_2">This paragraph color is yellow.</p>
</div>
</body>
</html>


Best practice should always be followed:


  • Attributes can always be specified inside the open tag of an element.
  • Attributes can be written as “name = value” paid.
  • Always use lowercase attributes.
  • HTML5 attribute value can be written without double or single quotes (“ ”), (‘ ’) but it recommended to always write attributes value into the double or single quotes. Attributes values without double or single quotes can be producing some unexpected results.
Related Topics

no image
In previous chapter we learnt ‘HTML Basics’. Now we will learn about HTML Elements.

Look at below example:


Example - 1

<h1></h1>Heading ElementIt has open & close tags
<p></p>Paragraph ElementIt has open & close tags
<img>Image ElementIt has open tag only. This calls Empty Element.
<br>Line break ElementIt has open tag only. This calls Empty Element.


From above example you can understand that an HTML element usually consists of open tag and close tag, with the content inserted in between and in HTML everything should be start with open tags and ends with close tags. Elements like <br>, <hr> do not have end tag and content that is why they are called empty element. Open tags also referred as Start tag and Close tag referred as End tag.

Do not ever forget Close tag


In HTML Close tag are very important. In some cases you can find close tag behave like optional but this doesn’t mean that close tag are optional. It is strongly recommended that every element start with open tag and ends with close tags.

Example - 2

<!DOCTYPE html>
<html>
<head>
<title>Example of Standard HTML Page</title>
</head>
<body>
<div>
<p>This is a first paragraph.</p>
<p>This is a second paragraph.

</div>
</body>


</html>


In above example both paragraphs will produce same result but it can be produce unexpected results and error in some cases if you forget to apply close tags.

How Empty Elements can be closed


HTML elements with no content are called empty element and empty element can be close also. HTML 5 doesn’t required empty element to be closed but  if you need to make your document readable by XML parser then you must close all HTML empty element. In below example you can see 'How Empty Elements can be closed'. Read carefully to understand.


Example - 3

<!DOCTYPE html>
<html>
<head>
<title>Example of Standard HTML Page</title>
</head>
<body>
<div>
<h1>This is heading</h1>
<p>This is a first paragraph. Paragraph length is enough so we have break the line with <br/> element. It is an empty element and it can written like <br/> </p>


<p>Below is image element and it can be closed  like <img/>, like below example </p>
<img  src = "https://goo.gl/oK5ctq"  width =  "140" height =  "140" alt = "Logo Image" title = "Progrramers Logo"/>

</div>
</body>

</html>


Tips: Search Engine uses XML sitemap of website therefore use of close tags essentially required for better result of search engine ranking.

HTML is not case sensitive


HTML is not case sensitive but always use lowercase HTML tags. Although HTML5 does not required the lowercase tags but W3C recommends lowercase in HTML. Always use the tag like below example.


Example - 4

<!DOCTYPE html>

<html>
<body>


<H1>My First Heading.</H1> (Not recommended).
<p>My first paragraph.</p>
<P>This way to write elements is not recommended.</P>

</body>

</html>


HTML Element can be Nested


Example - 5

<!DOCTYPE html>

<html>
<body>


<H1>My First Heading.</H1> (Not recommended).
<p>My first paragraph.</p>
<P>This way to write elements is not recommended.</P>

</body>

</html>


In above example you can see a standard HTML page. The way HTML elements are written is called nesting of elements. First you can see declaration; second thing you can see <html> tags which defines whole and after that the <body> tag defines complete body of document. After that <h1> and <p> tags are written under <div> elements. Every html page an example of nested elements.

Tips: Always use lowercase HTML tag and do not forget close each element. <p> tag is used for writing paragraph only.


Related Topics

In previous chapter we have learnt that What is an HTML document?
Now in this chapter we will see how to create an HTML document and how to save it. But before moving on that I want to make this clear that all of you must have a computer system in which a Text Editor program must be installed.

Tips: Go to Chapter - “What is an HTML document?”. at the bottom of the page there is a link given from where you can download Notepad++ and Installation guide link is also given.

Now we are all set to create a first HTML document.

HTML Document Declaration

All HTML document must start with a declaration like <!DOCTYPE HTML>. This is the very first line which is written in HTML document. It also called HTML Document Type Declaration. It specifies the version of the HTML document.


When we write <!DOCTYPE HTML> on the top HTML page that simply means that the HTML document version is HTML5. Below are the different versions of HTML and their declarations.


HTML 4.01 Strict<!DOCTYPE HTML PUBLIC "-//W3C//DTD HTML 4.01//EN" "http://www.w3.org/TR/html4/strict.dtd">
HTML 4.01 Transitional<!DOCTYPE HTML PUBLIC "-//W3C//DTD HTML 4.01 Transitional//EN" "http://www.w3.org/TR/html4/loose.dtd">
HTML 4.01 Frameset<!DOCTYPE HTML PUBLIC "-//W3C//DTD HTML 4.01 Frameset//EN" "http://www.w3.org/TR/html4/frameset.dtd">
XHTML 1.0 Strict<!DOCTYPE html PUBLIC "-//W3C//DTD XHTML 1.0 Strict//EN" "http://www.w3.org/TR/xhtml1/DTD/xhtml1-strict.dtd">
XHTML 1.0 Transitional<!DOCTYPE html PUBLIC "-//W3C//DTD XHTML 1.0 Transitional//EN" "http://www.w3.org/TR/xhtml1/DTD/xhtml1-transitional.dtd">
XHTML 1.0 Frameset<!DOCTYPE html PUBLIC "-//W3C//DTD XHTML 1.0 Frameset//EN" "http://www.w3.org/TR/xhtml1/DTD/xhtml1-frameset.dtd">
XHTML 1.1<!DOCTYPE html PUBLIC "-//W3C//DTD XHTML 1.1//EN" "http://www.w3.org/TR/xhtml11/DTD/xhtml11.dtd">


We will study about the declaration in further chapter. For now we will use <!DOCTYPE HTML> which represents HTML5.


HTML Tags and Body Tags

After the declaration we write the html open tag and it ends with close tag like <html> and </html>. Between html open and close tags there are two parts of the document. One part is not visible and other part is visible on web page. Non visible part is written between head tags and visible part is written between body tags. But between the head tags there is a tag which is displayed on webpage that is title tag which describe the title of the document. It displayed on the most top part of the web browser.

Now the whole document is look like below given below example:
Example - 1

<!DOCTYPE html>
<html>
<head>
<title>My first webpage</title>
</head>
<body>
<h1>This is heading </h1>
<p>This is a paragraph.</p>
</body>
</html>


Try yourself in Notepad++
Tips: Watch the video - How to create an HTML document.


Title Tags

In above example you have seen title tags like <title> and </title>. Title tags describe the title of the document. We must give a meaningful title to the document it helps the search engines to recognize and rank your web page(s).


Learn : What is Search Engine?

Now save the HTML document like below image. You can save it in computer storage wherever you want.

Example - 2

How to Save an HTML Document


Tips: Create a folder name ‘htdocs’ in C drive and save the file name as ‘index.html’.


If you are using notepad++ then write the above html code on your document, save as instructed above and press “CTRL” + “R” on you computer then your html document will be open in web browser and it will look like image given below.

Example - 3

Web Page example
Web Page example
You can see on above image where is the title is displayed.


Head tags

Now we move to head tags. HTML head tags defined with 6 different tags from <h1>  to <h6>. In below example (Example - 5) you can see moving from <h1> to <h6> the text size is reducing. But hey! be careful, always remember, that different head tags are used at different places of html page it does not show off the size of the text. it defines the importance of the headings we use. <h1> is most important heading and <h6> is the least important heading on a web page.

Example - 4


 <h1>This is Heading - 1</h1>
<h2>This is Heading - 2</h2>
<h3>This is Heading - 3</h3>
<h4>This is Heading - 4</h4>
<h5>This is Heading - 5</h5>
<h6>This is Heading - 6</h6>

Copy and paste above code in your index.html page and open into web browser and see what happens. 

Example - 5

HTML Head tags examples


Paragraph Tags

Now we move to paragraph tags. Whenever you write any article or any content that contains the paragraph on you webpage then those paragraph must be written between <p> and </p> like below :

Example - 6

<p>Hi! Welcome to Progrramers. This is my first webpage. I am learning at Progrramers. You are also invited to learn. It's completely free.</p>
<p>HTML is fun. You can also try. The specialty of this web school that you can learn here with full details. Let's learn at Progrramers.</p>

Tips: Line change and Paragraph change are two different things. Always remember each paragraph should be written in different paragraph tags. This practice help better to display your content at Mobile Browsers or Small Screen Devices Browsers.


Some Special Tags

There are some special tags which have neither closing tags nor contents. Like below

<br>
<hr>
<b>
<img> 

Tips: Read What is HTML?: HTML Introduction#Elements


HTML tags with Attributes

Some of the HTML tags work with attributes combined. If we remove the attribute from those tags then there is no meaning of their presence on web page like HTML Anchor tag and 
HTML Image tag.

HTML Links

HTML Anchor tags defines the Hyperlink on web page. The Anchor open tag is <a> and close </a>. The content is written between both tags and an attribute “href” defines the destination of the link. Like below:

<a href = “https://progrramers.blogspot.in/”> Learn HTML at Proprramers.</a>

This anchor link looks like shown in below example:

Example - 7

Learn HTML at Proprramers.


HTML Images

HTML images are defined on the web page with the Image tag. It is written like <img>. Image tag has no close tag and it work with “src” attribute. Image tag sets the frame to display the image on web page and src attribute fetch the image. It can be written like below:

<img src = “https://goo.gl/oK5ctq”  width = “140” height = “140” >

The result looks like below on web page.

Example - 8
Image on Web Page
Image on Web Page


In next chapter we will learn about HTML Elements.


Related Topics

An HTML document is a set of HTML element, attributes and other objects written in text format. You can say that HTML is a text document which is saved as .html extension.

Below is an example of HTML Document.
<!DOCTYPE html>

<html>

<head>
               
    <title>Web Page Title</title>

</head>

<body>

                <h1>Heading</h1>
                <h2>Sub-Heading</h2>
                <p>Paragraph</p>

</body>
</html>

How to Save HTML Documents.
Save HTML File with .html Extension

HTML document saved on servers but executed on the clients devices with help of web browsers like Internet Explorer, Google Chrome and Mozilla Firefox etc. HTML documents are served from the servers when client request it through web browsers on World Wide Web. HTML documents are downloaded on client’s devices and web browser renders the HTML documents line by line and gives the out as a webpage. Which line is written first on HTML document is renders and executed first on web page.


Tips:  This why programmers recommend that Java Script to be written on the bottom of the body.


What are Client’s Devices?

In the earlier days of development of World Wide Web there was only one way to access the HTML Document and that was Computer. But these days many kind of devices available which can access World Wide Web like Smart TVs, Computers, Laptops, Tabs Smartphone and Mobiles. These devices are act like clients on World Wide Web.

Which application is use to create HTML documents?

Generally we use text editor programs which are available free on Internet like “Notepad++”. But at beginning we can use “Notepad” application which is available by default in every version of windows and Mac. For better result like professional we can also use Dreamweaver application. But Hey! This program is not a freeware we have to pay sum of a healthy amount to purchase that application.

Can we use Microsoft Word or any word processing software?

Yes! We can but usually word processing programs are built to do specific type of word processing like Auto Correction, Spelling Suggestion and Word Caps formatting which can change the text format and create many problems. Although HTML is not case sensitive but remember we pages can’t be built only with HTML there are different High-level programming languages like Java Script which is completely case sensitive.

What is Case Sensitive?

Fruit, fruit and FRUIT are same word. There is only one meaning of all the three words but as far as “Case Sensitive” is concern all three words are different.

Tips: Therefore text editor applications are better choice then word processing application.


Related Topics

Introduction

Before we continue, one simple thing we need to clear that "What is HTML and What is HTML full form?". HTML is a markup language use to create web pages and web application. HTML stands for "Hyper Text Markup Language".

HTML tutorial for beginners

This HTML tutorial is specially designed for beginners with easy and properly explained HTML Tutorials examples.

Why HTML is called Client Side Script?

HTML pages are set of "HTML Elements" which resides on the local storage of a server computer that webcast the HTML documents which is received by a web browser running on client's device and after rendering it displays a standard web page with text, images, videos and other objects. This is also why HTML is called "Client Side Script".


HTML Tutorial, HTML5 Tutorial, HTML, html tutorials 5
HTML Page

Elements

HTML elements are like building blocks of HTML web pages which can be Decorated and Manipulated with the help of CSS and Java Script respectively. They are also called "Client Side Script". CSS can provide different shape, looks and motion to HTML elements on web page. JavaScript can do the Mathematical Calculation and Animation. Also JavaScript can deal with CSS and other objects. These days we cannot even think of web pages without CSS and JavaScript.

HTML elements usually consists of start tag and end tag. The contents is inserted in between both tags much more like  <tagname> Content </tagname>.

e.g. <h1>Progrramers</h1>.

Some of the element have no content which is called Empty Element. 
e.g. <br> which represent a line break on web page,
      <hr> Which represent a thin line on web page.

We will study about the other elements in further chapters.

HTML document filename extension is .html or .htm. Its internet media type is text/html. HTML discribe the structure of web pages using markup. The latest version of HTML is  HTML 5.1 2nd Edition which was published on 3rd October 2017 by World Wide Web Consortium.

 Below is a table that show the evolution of HTML version


Version Year
HTML 1991
HTML 2.0 1995
HTML 3.2 1997
HTML 4.01 1999
XHTML 2000
HTML5 2014

We will read more in Next Chapter.
HTML Basic


Related Topics

Progrramers
Progrramers


Hello There! I am Chandan Kumar Vishwakarma. Developer at Progrramer Blog. Progrramer is blog about website and App development using programming languages like HTML, CSS, Java Script, SQL, PHP and many more. I am also a learner like others and keen to program and create perfect and useful apps.

But this is not it. In our daily life we require much kind of web apps and local computer apps to manage our Business etc. For example in recent past days GST (Goods and Service Tax) is started by Indian Government and previous Tax system is eliminated from the system. Naturally GST is new Tax system in India so it is fortunate that Indian Businessman whether small or large scale face the problems while maintaining the Accounts.

Many of Companies are there who deals in Accounting Software like Tally, Marg etc. If your business is large scale then no problem you can depend on these types of companies but if you are running a small scale business than scene can be different and trouble making just because of the app for maintaining the accounts are very costly and you have to keep an accountant who can operate these apps.

In this case if you are little familiar with Access or Excel VBA/ Macro then very easily you can setup your own accounting database and on very little cost you can manage your Tax proceeding and as you like. No dependency on the any company and programmer.

In this blog I not only put the programming tips in easy way rather I put each and every content with full explanation, meaning full examples along with YouTube Video Support.

Tips and Tutorials are available with complete series of website and App development. New programmer can learn so many things from this Blog.

I also believe that online jobs are very helpful at part time which gives you a chance to earn very healthy sum of amount on less cost of labour. Hence this blog also concentrate on “How to do online earnings”. Google, Facebook, YouTube and Many companies are there who gives the benefits against Native Ads to website and app developers.

I hope that you are also keen to create a perfect digital world of Software and Programs. If you have any suggestion for me please write into the comment box and share your contact link like G+, FB, and Gmail etc.

Progrramers
Progrramers


Subscribe my blog now to get latest updates.
Thank You and Best Wishes!
Chandan Kumar Vishwakarma
Follow me @ fb: https://www.facebook.com/theprogrramers


Related Topics